


Google Workspace (formerly G Suite) has exceptional features for working together amongst your team members/customers / prospective customers/government workers/students/teachers/parents… etc. Just so you know, Google Workspace is for everyone. So, let’s see what you stand to gain using Google Workspace.
Below are the key features of Google Workspace to promote good team bonding and enhance productivity in your business :
- Gmail: Send and receive emails using your work email address(for example; Joe@abc.com) via the Gmail platform. All you have to do is follow the steps below:
(Note: Make sure you have an existing Domain before following these steps, if you don’t have a Domain click here to purchase one)
a)Sign up for a Google Workspace account or log in to an existing one.
b)Access Gmail by clicking here
c)Use Gmail’s chat feature to communicate with co-workers in real-time (Start a chat by clicking on the chat icon > New Chat > Type the name of the person you want to chat with)
Tip: Do you know you can chat with someone outside your organization using Google chat but the person must have a Google Workspace account).
- Google Calendar: It’s so thrilled to know that once you purchase Google Workspace you also purchase a personal assistant(😄) who reminds you of your day-to-day activities every now and then. I will show you how to set up your activities/events/meetings on Google Calendar, see below;
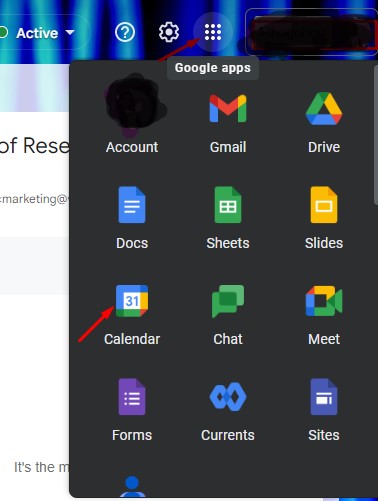
a)Go to calendar.google.com and sign in with your Google account or go to Google Apps from your Gmail page as shown in the above image.
b(Create an event/meeting/reminder by clicking on the date and time you want it to start and end, or use the “Create” button.
c)Enter event/meeting/reminder details such as title, location, description, and add guests if needed.
d)Choose a color for the event to categorize it(Not Compulsory).
e)Set the duration you wish to be reminded about the event/meeting, repeat the event, or make it an all-day event.
d)Scroll down and click on Save.
e)You can also import or export calendars, share your calendar with others, and view multiple calendars at once.
To be continued…….
- Google Meet: This is a Google Meeting platform. Now that you have successfully set up your meeting in your calendar. It’s meeting O! clock, let’s hop into the meeting and seal that million-dollar deal or collaborate with a team to improve productivity. See the steps below;
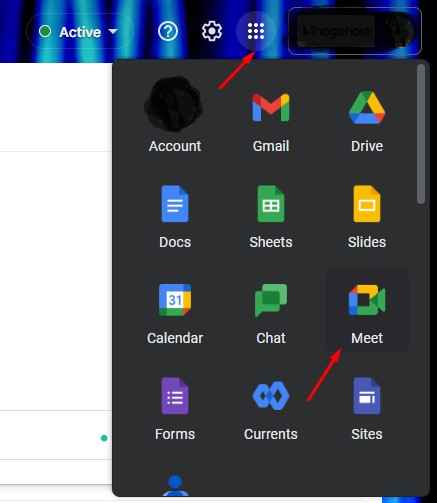
a)Go to meet.google.com or click on the Google Apps Icon in your Gmail then click on meet as shown in the image above.
b)Click on the “New Meeting” button to start a new meeting or join an existing meeting you have been invited to..
c)Invite people to your meeting by sending a link, email, or calendar invite.
d)Once people have joined your meeting, you can start a video call, share your screen, and chat with other participants.
e)To end the meeting, click on the “End meeting” button.
Whoa! It’s that simple, right?
Tip: Do you know you can also quickly set up a meeting on the go while on chat with someone. Check the image below

- Google Docs: Use Google Docs for real-time collaboration and also save some important work files.
a)Go to docs.google.com or Click on Google Apps from your Gmail then click on DOCs
b)Click on “Blank” to create a new document or “Template Gallery” to choose a premade template or go to Drive to view documents shared with you.
c)Start editing the document, you can format text, insert images and tables, add comments, and collaborate with others in real-time.
d)Save the document by clicking “File” > “Save” or “Save As”.
Note: You can also upload existing documents to Google Drive and open them in Google Docs for editing.
- Google Sheets: Keep up to date with your daily transactions using Google Sheets
a)Go to Google Apps > Sheets and create a new sheet or open an existing one
b)Enter data into cells by clicking on them and typing
c)Format cells using options in the toolbar or right-click menu
d)Use functions and formulas (e.g. SUM, AVERAGE, MAX) to perform calculations
e)Create charts and graphs to visualize data
f)Share and collaborate with others by giving access to specific people or publishing as a web page.
g)Save and download your sheet in various file formats like .xlsx, .csv, .pdf, etc..
- Google Slides: Start that presentation with Google Slides for easy navigation, see below for how to use it:
a)Go to Google APPs > Google Drive and Create a New Google Slides Presentation: On the left-hand side of your Google Drive, you will find the “New” button. Click on it
b)Choose a Template: You can either start with a blank presentation or choose from a wide range of templates. Select the template that best fits your needs and click “Use this template”.
c)Add and Format Text: Start by typing your text into the slide. You can adjust the font, size, color, and alignment using the toolbar at the top. You can also add images, videos, and shapes to your slides.
d)Transitions and Animations: To add visual effects to your presentation, you can use the “Transitions” and “Animations” options. Click on the “Transitions” tab in the toolbar and select the animation you want to use.
e)Collaborate: You can share your presentation with others by clicking the “Share” button in the top right corner. You can also add comments and chat with other collaborators.
f)Present Your Slides: To present your slides, click on the “Present” button in the top right corner. You can either present your slides directly from your computer or use a secondary display.
g)Save and Download: When you are finished, save your presentation by clicking the “File” menu and selecting “Save”. You can also download your presentation as a PowerPoint, PDF, or another file format.
- Google Drive: Cloud storage for files and documents. See below;
a)Go to drive.google.com and go to Google Apps > click on Drive
b)To create a new document, click the “New” button and select the type of file you want to create, such as Google Docs, Sheets, Slides, or Forms.
c)To upload files to Google Drive, click the “New” button and select “File upload.” You can also drag and drop files from your computer into Google Drive.
d)To share a file with someone, right-click the file and select “Share.” You can then add the email addresses of the people you want to share with and specify the level of access they have to the file.
e)To access and edit a file, simply click on the file name in Google Drive. You can also use Google apps for editing and collaboration, such as Google Docs, Sheets, and Slides.
f)You can search for files in Google Drive by typing keywords into the search bar at the top of the page.
g)Backup and sync: To backup and sync your files, install the Google Drive app on your computer. This will automatically upload and sync all your files from your computer to Google Drive
To use these features, you can sign up for a Google Workspace account and access the tools through a web browser or the Google Workspace mobile app. The tools can be used individually or in combination to collaborate on projects, communicate with team members, and manage tasks and schedules. Click here to sign up