


WordPress themes are commonly used to create interactive websites that are both user-friendly as well as according to the client’s needs. For most clients, the most important requirement is that the website should have WordPress Optimization, should be easy to navigate, and user-friendly as it helps the visitors get information as soon as possible.
For any website to be user-friendly, it is important that navigation is easy and simple. A navigation bar is the horizontal list of links that are displayed on the top of the website. Most of the templates do not have easy-to-use and responsive navigation menus; hence developers tend to add customer navigation bars.
Although the themes come with pre-defined navigation bars, if it is not according to your liking or your client’s requirement, you can easily add your own. In this article, we are discussing how to make custom navigation menus in WordPress themes in a few simple steps:
Step 1: How to Create Custom Navigation Menus in WordPress Themes
WordPress themes have a feature of navigation menus, and themes have their own location and support for navigation bars. To add a custom menu bar, you have to first register your newly created navigation menu by adding the following code in your theme’s file named “function.php.”
function wpb_custom_new_menu() {
register_nav_menu(‘my-custom-menu’,__( ‘My Custom Menu’ ));
}
add_action( ‘init’, ‘wpb_custom_new_menu’ );
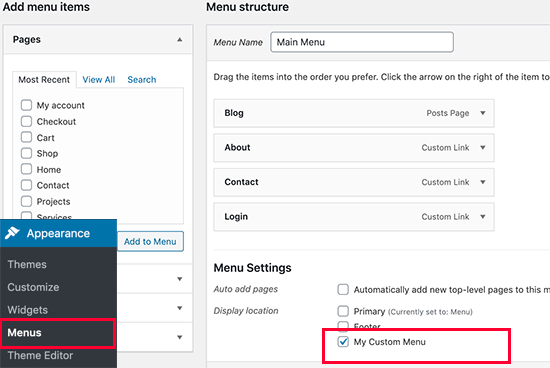
The next step is to check
- Appearance » Menus page in your WordPress admin panel
- create or edit a new menu.
- Select ‘My Custom Menu’ as the theme location option.
For multiple navigation menu locations, use a code like this:
| function wpb_custom_new_menu() { register_nav_menus( array( ‘my-custom-menu’ => __( ‘My Custom Menu’ ), ‘extra-menu’ => __( ‘Extra Menu’ ) ) ); } add_action( ‘init’, ‘wpb_custom_new_menu’ ); |
Step 2: Displaying Custom Navigation Menus in WordPress Themes
Most of the time, a navigation bar is placed on the header of the website as it allows easy and quick access. Our next step now is to display the navigation menu that we have created in the WordPress theme that you are using. You can also display it next to the logo or site title.
However, it is up to your choice where you want to place the navigation bar. In your theme’s template file, add the code below to display the navigation bar:
| 1 2 3 4 5 | <?php wp_nav_menu( array( ‘theme_location’ => ‘my-custom-menu’, ‘container_class’ => ‘custom-menu-class’ ) ); ?> |
The theme location indicated by “my customer menu” is the name that we selected in the previous step. The container class is the CSS class that is added to the navigation bar. A plain bulleted list of menu will now be added on your website.
Styling Menu Bar:
Now to style the menu you can add .custom_menu_class to style your menus. Below is a sample code:
div.custom-menu-class ul {
margin:20px 0px 20px 0px;
list-style-type: none;
list-style: none;
list-style-image: none;
text-align:right;
}
div.custom-menu-class li {
padding: 0px 20px 0px 0px;
display: inline;
}
div.custom-menu-class a {
color:#FFFFFF;
}
Design a Navigation Bar:
The design and aesthetics of the navigation bar is totally your own choice and must compliment the theme that you are following. However, you can customize it however you want. If you wish to have a navigation bar in a header file, create a style for the navigation bar in a style.css file, and there is a file custom_style.php in a folder “u-design\styles\custom\.” Open this file and change the #navigation-menu setting according to your custom requirements.
Styling WordPress Navigation Menus Using a Plugin
If you are a beginner or do not want to add code for styling a navigation menu bar, you can use WordPress plugins for that. These plugins make the job easier and have multiple designing options. The first step is that you need to install and activate the CSS Hero plugin.
Wondering what a CSS Hero plugin is? It is a premium WordPress plugin that helps you to design your own WordPress theme without writing a single line of code (No HTML or CSS required). Amazing, isn’t it?
Once you activate it, you will get your CSS Hero License key. You have to follow the on-screen instructions, and you will be redirected back to your site after a few steps.
Now click on the CSS Hero button in your WordPress admin toolbar.
There is a What you see is what you get (WYSIWYG) editor in CSS hero. Click on the button, and you will be redirected to your website with a floating CSS Hero toolbar visible on the screen, so it gets easier for you to witness the changes.
The toolbar on the side has multiple options; start by clicking on the top blue icon, and you will see the list of sections that you can edit. You can also edit different properties like the text, background, border, margins, padding, etc. After clicking any property, you would be shown interface options that you can use to your liking. As you edit, you would be able to see the changes right in front of you.
Once you are done editing, you can click on the Save button, and your changes would be saved. Moreover, if you aren’t satisfied with the results or want to undo any changes, you can easily do that. CSS Hero saves all the changes history so you can easily go back and make changes.
This is perfect for people who aren’t interested in coding and want to keep it simple. Even beginners can do the changes without much knowledge of programming or styling.
To Sum It Up:
The above was a simple and easy to follow guide to add and style a custom navigation bar in your WordPress theme. No matter which theme you are using, the above-mentioned steps will help you add a navigation bar of your choice within a matter of few hours or even minutes.
You can keep it as simple as you want or add styling using plugins as mentioned above. There is no restriction of position or style while adding a custom menu, and it can be styled per your requirement.